Install multiple instances of inRiver PIM
inRiver version 6.3.0 SP2
From inRiver Wiki: "From version 6.3 it is possible to have multiple inRiver servers in one system" inRiver Wiki (requires login)
For this walk-through I will use the Customer1 and Customer2 as the names on the instances installed.
First instance
Download and install inRiver PIM
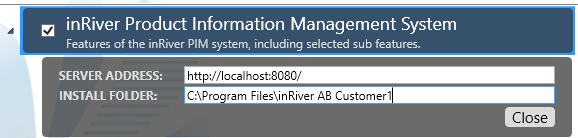
Once the installation starts, choose Advanced installation
Set server address: http://localhost:8080/
Set installation folder: C:\Program Files\inRiver AB Customer1
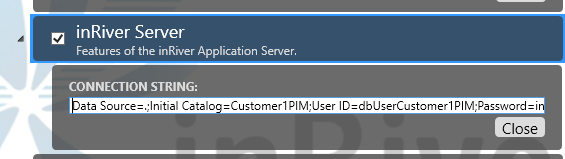
Set database connectionstring
Data Source=.;Initial Catalog=Customer1PIM;User ID=dbUserCustomer1PIM;Password=inriver123
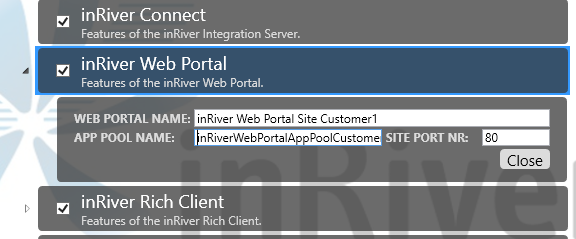
Set web portal name: inRiver Web Portal Site Customer1
Set app pool name: inRiverWebPortalAppPoolCustomer1
Run installation
Create database
Create database Customer1PIM with filestream enabled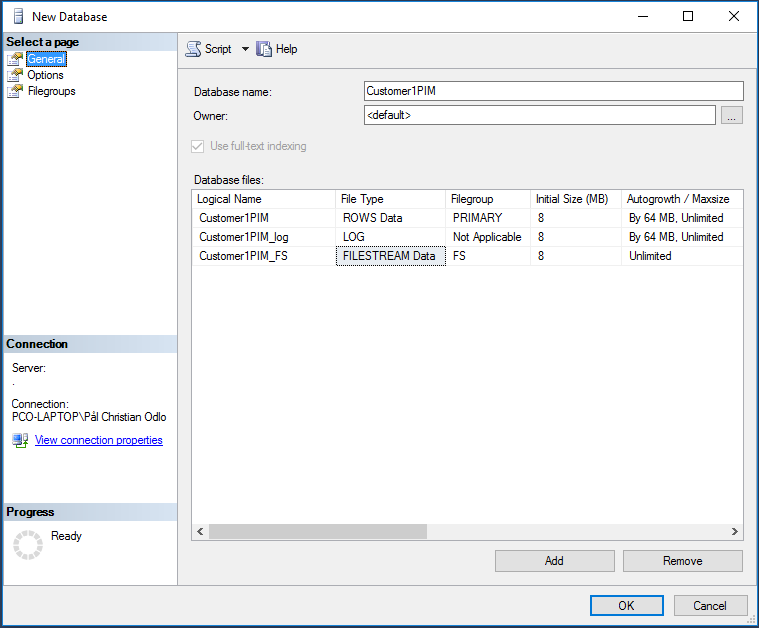
Create login dbUserCustomer1PIM with password inriver123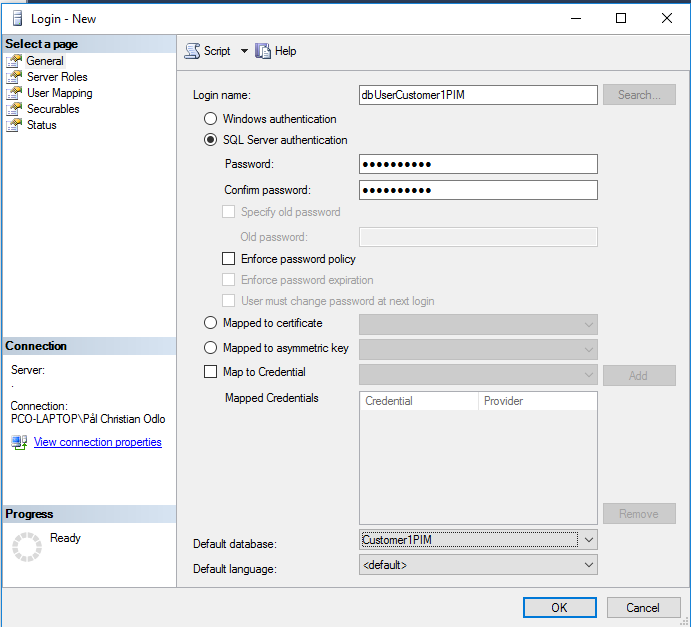
Map the login to Customer1PIM database with db_owner role
Enable configurations
Rename file "C:\Program Files\inRiver AB Customer1\inRiver Server\inRiver.Server.exe.Config.Sample" to "C:\Program Files\inRiver AB Customer1\inRiver Server\inRiver.Server.exe.Config"
Rename file "C:\Program Files\inRiver AB Customer1\inRiver Connect\inRiver.integration.exe.config.Sample" to "C:\Program Files\inRiver AB Customer1\inRiver Connect\inRiver.integration.exe.config"
Change configurations
In C:\Program Files\inRiver AB Customer1\inRiver Server\inRiver.Server.exe.Config, change the message queue names
<add key="ServerInternalLogMessageQName" value="Customer1ServerInternalLog" />
<add key="ConnectNotificationMessageQName" value="Customer1ConnectNotifications" />
In C:\Program Files\inRiver AB 3 Customer1\inRiver Connect\inRiver.integration.exe.config, change the message queue names
<setting name="ServerListenerMessageQName" serializeAs="String">
     <value>Customer1ServerListener</value>
</setting>
 <setting name="ConnectInternalLog" serializeAs="String">
    <value>Customer1inriverConnectInternalLog</value>
</setting>
Delete services created by inRiver installation
In a command prompt with administrative privileges run the following commands
C:\>sc.exe delete InRiverConnectWindowsService6

C:\>sc.exe delete InRiverServerWindowsService6
Create services for the inRiver server and connect services
In a command prompt with administrative privileges run the following commands
C:\>sc.exe create inRiverServerServiceCustomer1 binPath= "C:\Program Files\inRiver AB Customer1\inRiver Server\inRiver.Server.exe" start= auto

C:\>sc.exe create inRiverConnectServiceCustomer1 binPath= "C:\Program Files\inRiver AB Customer1\inRiver Connect\inRiver.Integration.exe" start= auto depend= inRiverServerServiceCustomer1

C:\>sc.exe start inRiverServerServiceCustomer1
Navigate to http://localhost to verify inRiver web portal is up and running
Second instance
Copy the folder "C:\Program Files\inRiver AB Customer1" to "C:\Program Files\inRiver AB Customer2"
Give the user IIS_IUSRS full control on the folder "C:\Program Files\inRiver AB Customer2\inRiver Web"
Change configurations
Open the file C:\Program Files\inRiver AB Customer2\inRiver Server\inRiver.Server.exe.Config in a text editor
Change server address(use a different port than 8080)
<add key="ServerUrl" value="http://localhost:9090/" />
Change message queue names
<add key="ServerInternalLogMessageQName" value="Customer2ServerInternalLog" />
<add key="ConnectNotificationMessageQName" value="Customer2ConnectNotifications" />
Change IntegrationRestServerUrl(use a different port than 8081)
<add key="IntegrationRestServerUrl" value="http://localhost:9091/" />
Change connectionstrings
<connectionStrings>
     <add name="inriver" providerName="System.Data.SqlClient" connectionString="Data Source=.;Initial Catalog=Customer2PIM;User ID=dbUserCustomer2PIM;Password=inriver123"/>
     <add name="inriverResources" providerName="System.Data.SqlClient" connectionString="Data Source=.;Initial Catalog=Customer2PIM;User ID=dbUserCustomer2PIM;Password=inriver123"/>
 </connectionStrings>
Open the file C:\Program Files\inRiver AB Customer2\inRiver Web\Web.config in a text editor
Change server address
<add key="ServerUrl" value="http://localhost:9090/" />
Change client endpoint
<client>
 <endpoint binding="wsHttpBinding" bindingConfiguration="WSHttpBinding_IIntegrationService" contract="IntegrationServiceReference.IIntegrationService" name="WSHttpBinding_IIntegrationService" address="http://localhost:9090/IntegrationService/"/>
</client>
Open the fileC:\Program Files\inRiver AB Customer2\inRiver Rich Client\inRiver.RichClient.exe.config in a text editor
Change server address
<setting name="inRiverServer" serializeAs="String">
    <value>http://localhost:9090/</value>
</setting>
Open the file C:\Program Files\inRiver AB Customer2\inRiver Model Tool\inRiver.PIM.ModelTool.exe.config in a text editor
Change server address
<setting name="inRiverServer" serializeAs="String">
 <value>http://localhost:9090/</value>
</setting>
Open the file C:\Program Files\inRiver AB Customer2\inRiver Connect\inRiver.integration.exe.config in a text editor
Change server address
<setting name="inRiverServerUrl" serializeAs="String">
    <value>http://localhost:9090/</value>
</setting>
Change message queue names
<setting name="ServerListenerMessageQName" serializeAs="String">
    <value>Customer2ServerListener</value>
</setting>
<setting name="ConnectInternalLog" serializeAs="String">
    <value>Customer2inriverConnectInternalLog</value>
</setting>
Change OwinRestServerUrl
<setting name="InternalOwinRestServerUrl" serializeAs="String">
    <value>http://localhost:9091/</value>
</setting>
Create database
Create database Customer2PIM with filestream enabled
Create login dbUserCustomer2PIM with password inriver123 and map the login to Customer2PIM database with db_owner role
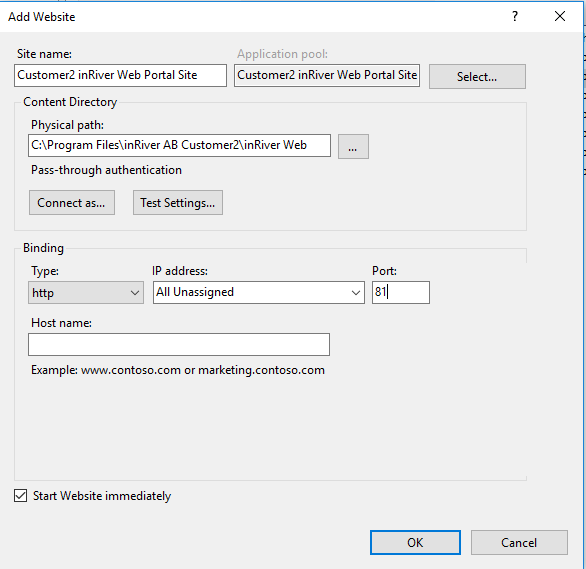
Create website in IIS
Add website
- Set site name: Customer2 inRiver Web Portal Site
- Set physical path: C:\Program Files\inRiver AB Customer2\inRiver Web
- Set port: 81
Create services for the inRiver server and connect services
In a command prompt with administrative privileges run the following commands
C:\>sc.exe create inRiverServerServiceCustomer2 binPath= "C:\Program Files\inRiver AB Customer2\inRiver Server\inRiver.Server.exe" start= auto

C:\>sc.exe create inRiverConnectServiceCustomer2 binPath= "C:\Program Files\inRiver AB Customer2\inRiver Connect\inRiver.Integration.exe" start= auto depend= inRiverServerServiceCustomer2

C:\>sc.exe start inRiverServerServiceCustomer2
Navigate to http://localhost:81 to verify inRiver web portal for Customer2 is up and running
NOTE: If you use host name on the websites, all inRiver Web Portals could run on port 80. This way it is easier to remember the url for each inRiver Web Portal