UI frameworks and Optimizely CMS 12 plugins
Recently been developing a plugin and wanted to share some things we've come across. Please note that I'm not a dedicated frontend developer, some things featured in this blog post will probably have our frontend devs and designers pulling their hair out. I'm sharing because my intended audience are backend devs that have trouble making a simple and clean UI that resonates with the Optimizely CMS UI.
While writing this post I wrote reference code that I'd like to share. Unfortunately it doesn't all fit inside of this blog post. If you want to follow along with the steps described clone this branch and repo (its a version of Optimizely CMS Foundation).
Please have a look at the requirements for that project in the readme.md (.NET 5 sdk and NodeJS). You'll have to run the console commands in there at some point.
Layout framework
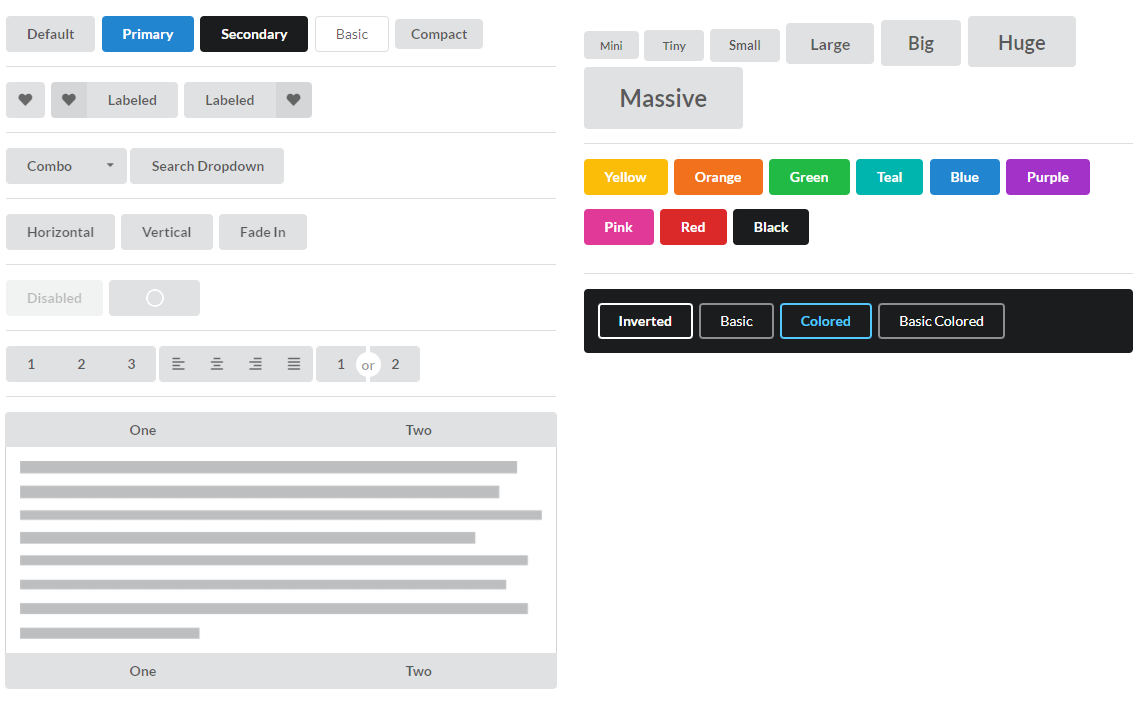
This guide uses Fomantic UI (a community version of Semantic UI). Use that site as a reference to what elements that are available. The framework is fully themeable, and to show that potential and to make the styling cohere with Optimizely I've modified the base font and the weight of the headings. There's no accounting for taste, but I find it to be easy on the eye.
Scaffolding
First create a Razor class library via your favorite IDE (for tutorial purposes I named it Cms.UI.Plugin, which is of course yours to change). Then clean everything out except the folder named /wwwroot, this is where your frontend files should go when you build.
In your newly created project, add a framework reference to Microsoft.AspNetCore.App, then add the following inside your project file (TypeScript blocking is optional, but gets rid of some irrelevant error messages, since we're going to be using webpack for this).
<PropertyGroup>
	<AddRazorSupportForMvc>true</AddRazorSupportForMvc>
	<TypeScriptCompileBlocked>true</TypeScriptCompileBlocked>
</PropertyGroup>
Create a folder named Cms.UI.Plugin.Views/Views, then add _ViewStart and _ViewImports file in there. Too many details on that found here.
Frontend
Open up a command prompt inside of your newly created project folder and run npm init, input some data to seed the package.json that is about to be created. If you have no idea what that is, read this before continuing.
Run npm install for the following dependencies using the --save-dev argument (or just npm install without arguments once, if you're using the preexisting package.json).
- fomantic-ui-sass
- sass
- typescript
- path
- webpack
- webpack-cli
- ts-loader
- css-loader
- sass-loader
- css-minimizer-webpack-plugin
- mini-css-extract-plugin
- rimraf
npm install fomantic-ui-sass --save-devCreate and configure webpack.config.json with two entry points (and two outputs), one for a container.ts one for entry.ts.
Webpack is a powerful module bundler that's capable of handling transpiling of different resources like sass or typescript to js and css bundles using loaders and plugins. Making frontend development either simpler or harder depending on which packages that are installed.
The config file for webpack is set up in such a way that it enters a typescript file and reads sass, css or other typescript files that it encounters along the way. The MiniCssExtractPlugin.loader will extract styles found into a separate file.
Moving on, create some commands in package.json that can you can run using npm run {scriptname}.
"scripts": {
  "clean": "rimraf ./wwwroot",
  "watch": "npm run clean && webpack --watch --progress --config ./webpack.config.js --mode development",
  "build": "npm run clean && webpack --config ./webpack.config.js --mode production"
},
The watch script will continously update files in /wwwroot if any content linked by an entry point is changed. The flag --mode development leaves the resulting files unminified. Development mode also includes sourcemaps to simplify debugging in browser.
If you haven't already done so I recommend opening the project folder with Visual Studio Code or other frontend inclined IDE and using the terminal from in there.
Run it and try it out, first copying the contents from /Frontend and template.html to your project root. Then opening template.html with a browser.
The dual file generation is there because of existing styling being applied when Optimizely runs Html.CreatePlatformNavigationMenu. Short version: this makes applying other styles than built in Optimizely styles a living hellhole somewhat harder.
Luckily my colleages in Latvia mentioned that to get around this you can create an iframe and just display your content through that instead. Following that solution, we need some styles for the iframe page, and some for the content inside it.
Container.ts (included on the iframe page) contains a script that adds listeners, which recieve events when the content window changes size. It then automatically adapts the iframe so that it matches up with the content (even if size is changed during runtime, like the user clicking an accordion).
For posterity: this script makes an assumption that the Optimizely navigation bar is 40 pixels high. This might change in the future and yield some unexpected visual quirks, like double scroll bars.
Backend
Create two controllers ContainerController and ContentController, for this tutorial they just need to return View(). Then install the nuget EPiServer.CMS.UI.Core >= 12.0.2.
After implementing IMenuProvider and decorating the class with [MenuProvider] like in MenuProvider.cs, an additional menu option should become visible in the CMS menu.
The property Name controls what is shown in the menu. Url needs to be a module specific path to the ContainerController. Module specific paths can be resolved using the static class Paths in the EPiServer.Shell namespace like this. Path controls where the button is placed in the heirarchy.
More on menu providers.
public IEnumerable<MenuItem> GetMenuItems()
{
    var name = "Cms Plugin";
    var url = Paths.ToResource(GetType(), "Container");
    var path = MenuPaths.Global + "/cms/adminplugin";

    var link = new UrlMenuItem(name, path, url)
    {
        SortIndex = 200,
        AuthorizationPolicy = CmsPolicyNames.CmsAdmin
    };

    return new List<MenuItem>
    {
        link
    };
}
Create and configure module.config (full documentation here). Which contains a list of which assemblies that are to be considered included in the module.
Add content to layouts _Layout.cshtml and _ShellLayout.cshtml, the latter should contain the iframe that we discussed above, in this file you also have the opportunity to modify the document title to be shown when viewing the plugin. Using the url pattern /_content/Cms.UI.Plugin/ you can route directly into the /wwwroot folder of your Razor Code Library project.
Create index views for ContainerController and ContentController.
Testing
To make the plugin testable from inside the CMS you need to first reference this project from a web project (in this case Foundation.csproj). Copy over the module.config and add the protected module to appsettings.confg.
Now is a good time to run the command npm run build to place some minified files inside your /wwwroot folder before viewing the page.
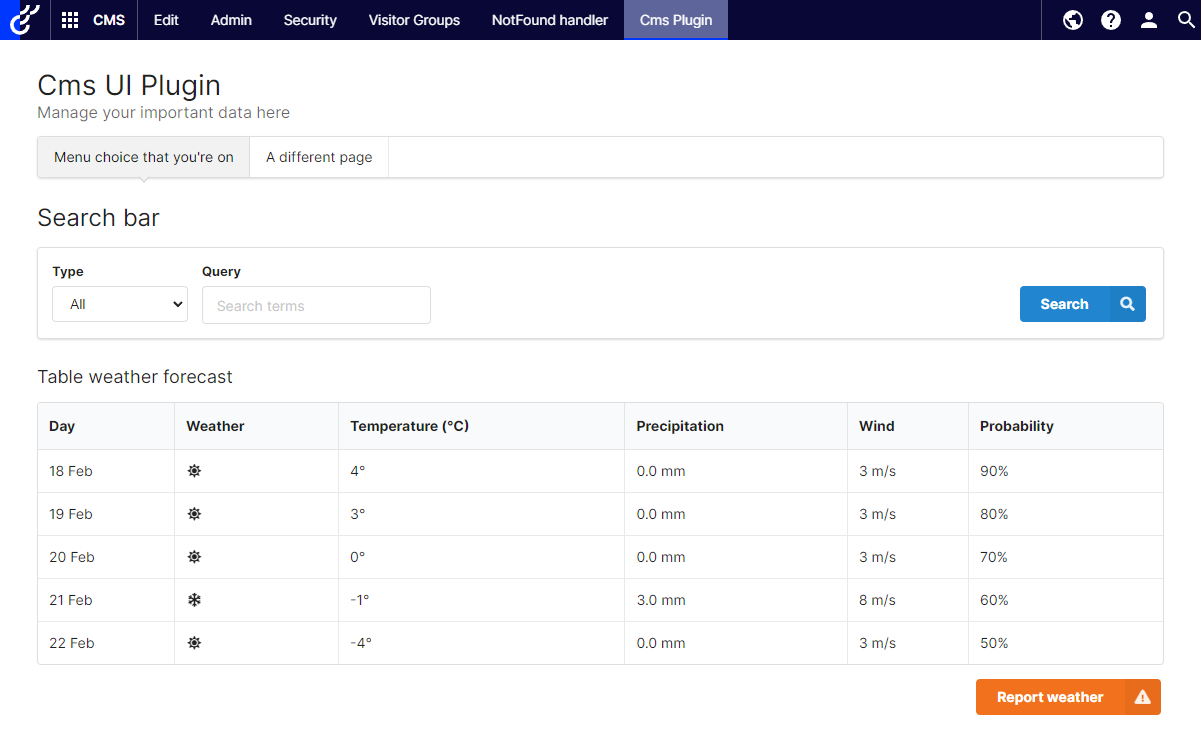
It should look like this when you're done.
There are a couple of more steps before the project is a distributable nuget package, but we'll save that for another time.
Kontakt oss her